Posts

Paper Mosaic

Image
This lesson required the students to identify what positive and negative space is. They utilized the negative and positive space by placing their pieces of paper over their mosaic "tiles". Materials needed were; paper tiles, scissors, glue, mod podge, paint brush, and a large sheet of construction paper. After they would cut out their positive and negative space out of construction paper. For most of the project, they needed to cover their background, or big construction piece, with their mosaic tiles and mod podge. When they were finished covering their background, they needed to add on their positive and negative sheets. One requirement was the positives need to be kitty-corner from each other and the same with the negatives. To finish the project, they covered the entire project with mod podge to create a nice shiny surface. For an extension activity, they could create a paper mosaic in the shape of a heart for Valentines Day as a gift for their parents or someone they...

Basketweaving

Image
For the basketweaving activity, the students would weave their own baskets by using plastic cups and yarn. Materials needed include pre-cut plastic cups, yarn, and a sharpie. Each cup already had pre-cut spokes for the students to weave their yarn through. The sharpie is for them to write their initials on the bottom of the cup. As they begin to weave their yarn through the spokes, they must keep in mind that they are to use at least three different colors for their pattern. When they get to the end of their string, they just tie the end to a new color and weave the new string. They gradually work their way up the cup and tie off their strings on the inside of the cup. For an extension activity, the students could maybe weave a placemat rather than a cup. A placemat could prove to be more useful when they bring them home. They would be able to use it on their tables at home whenever they eat.

Printmaking

Image
This activity was printmaking. Materials used were acrylic paint, jelly plates, stamps, stencils, and rollers. A requirement for this activity was to use at least two different colors per picture and three different patterns overall. The students learned about what a ghost print is and how to use one with the jelly plate. The flower on the far left was the ghost print. The middle was inspired by leaves seen on campus and the far right is a butterfly. The students also had to create an artist statement out of two sentences on a notecard in the middle of the page. For an extension activity, the students could do shaving cream marbling on paper. Materials needed would be shaving cream, liquid color paint, dropper, stir stick, cardstock, scraper, and a big bowl to mix them. They would spray the shaving cream into the bowl or pan, then drop the paint into the cream using the dropper. After the paint is in the cream, they will use the stir stick to blend the paints together to create tha...

Clay Eggs

Image
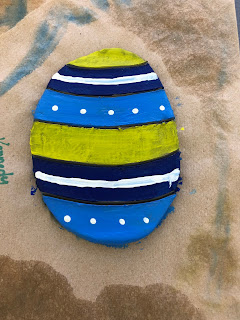
This activity was tied to the Easter holiday. Each student received a ball of clay, an egg outline, and a roller. They had to map out their egg design before they began with their clay. This ensured that the students' clay wouldn't dry up on them from taking up time. When they were ready to roll out their clay, they used two sticks and their roller. The sticks ensured that the clay got an even roll. After it was rolled evenly they got to mold the clay into an egg shape. It was a requirement for the students to add or subtract from their clay. They just had to do one or the other. For this egg, we subtracted clay. When they had finished they got to paint their egg. Requirements for the painting aspect they had to have two primary colors and a tint. The two primary colors used here are blue and yellow. The tint is light blue.  For an extension activity, students could make clay caterpillars for the beginning of spring. You could still have the students use two primary colo...

Music/Emotion Painting

Image
Painting 1 (Dry Brush & Graded Wash) Painting 2 (Graded Wash, Wet-on-Wet & Scraffito) For this lesson, we learned six different techniques of painting with watercolor. These techniques included; dry brush, graded wash, wet on wet, scraffito, crayon resist and flat brush. We had divided a big sheet of paper into six different sections so we could practice our techniques. After we practiced, we got the chance to listen to music and paint our own paintings along with it. The requirements for these paintings were that we had to use at least two different types of painting techniques and it couldn't be the same two for both paintings. For an extension activity, instead of using music to evoke emotion from the students, you could incorporate literature. You could read a piece of poetry or a blip from a story and they would have to paint what came to their mind when they heard it. You always hear that while you're reading a story you come up with a dramatization in y...

Adjective Drawing Activity

Image
For this activity, we were assigned to write down four adjectives that described ourselves and our names. After we had our adjectives picked out, we learned about the different types of lines you can create. We were instructed to divide our big sheets of paper into five different sections using five different types of lines. Once our papers were divided we were instructed to write our adjectives and our names within each section making sure that our letters touched the top and bottom lines. After writing our adjectives, we were tasked to create at least ten different designs, two in each section, between our letters in crayon. The purpose of the crayon designs was to stand out in the watercolor. We made sure to not repeat colors next to each other with our watercolors. In the finished product, you should be able to see the designs within the adjectives and through the watercolor. For an extension activity in the spring, you could have the students create a flower outline with oil p...

Van Gogh Inspired Collages

Image
For this activity, we were directed to create a piece of art inspired by Vincent van Gogh. Before beginning this task, we had looked at some of Van Gogh's past works. The piece that inspired this activity was his painting The Starry Night, 1889. In order to create movement in the background of the piece we took oil pastel and created the flowing dotted lines throughout. Another aspect of Van Gogh's work is the overlap of colors. We captured that by layering bleed and non-bleed tissue paper. That way it would look like the colors were blended more. In an effort to replicate the aspen tree in The Starry Night we cut silhouettes out of black construction paper and added detail by using oil pastel. For an extension activity, you could have your students look at an artist such as Claude Monet. He was known for his water scenes and it would be fun for the students to try to create their own pieces inspired by his works. The students could tape off the pieces of the paper they wou...